

How To Create Personal Filters In Servicenow
Make your website filterable by category
Content-based websites often link to articles from the homepage, but previewing all articles on a single page has a dramatic impact on performance. Introducing pagination reduces load time and Ajax can prevent the need for page reloads.
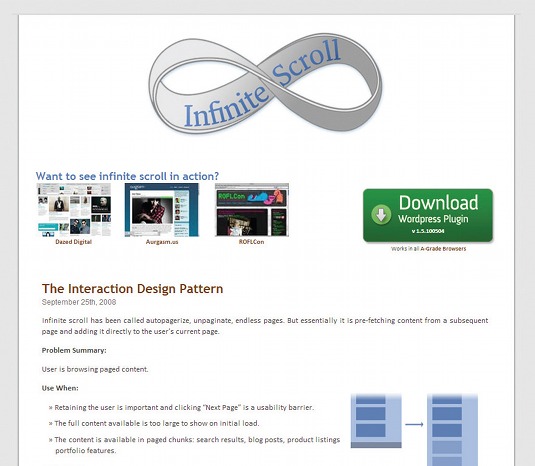
Paul Irish's Infinite Scroll jQuery plug-in develops this solution further by removing pagination from the user journey and gradually adding more content, growing the page as the user scrolls.
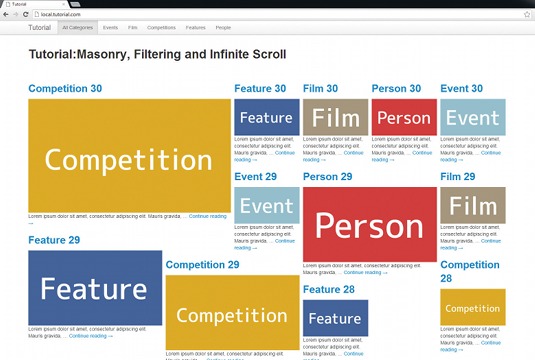
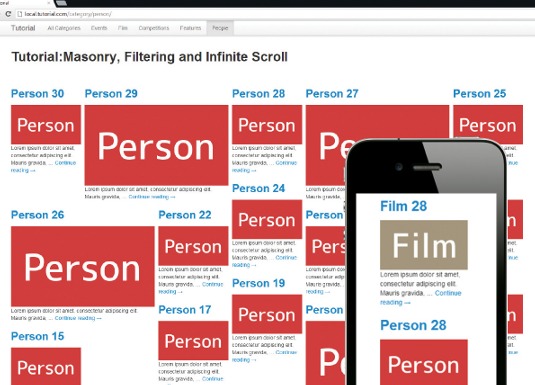
The Masonry layout has become a popular way of displaying content. As well as being visually appealing, the use of differently sized blocks for individual pieces of content helps to highlight prominent articles. The Metafizzy Isotope jQuery plug-in provides documentation on integrating Masonry with Paul Irish's Infinite Scroll.
Filter challenge
But what if you additionally want your content to be filterable by category, without having to reload the page? That was the challenge that we faced at Zone during our recent project to reskin the Relentless Energy Drink website.
Isotope offers in-page filtering, which operates by hiding elements on the page. Unfortunately, this cannot be used in conjunction with Infinite Scroll - this is because the pagination takes into account hidden items and the user experience becomes very strange.
The Isotope website states: "I recommend against using Infinite Scroll with filtering or sorting … new content gets added, but part of it might be hidden. There is no way for the user to tell what gets hidden or re-arranged when Infinite Scroll adds more content."
In this tutorial we're going to produce a homepage that displays filterable content in a Masonry layout, using Infinite Scroll to load older articles as the user journeys down the page. You can download the support files here.
Basic set-up
I'm going to use WordPress, but the jQuery we develop can be applied with minor changes to any CMS. Download WordPress, log into the CMS and add the Advanced Custom Fields plug-in. We use this to add a custom size_on_homepage field to posts, so we can select the size of each article in the Masonry layout.
I have exported 150 dummy posts - 30 for each of five categories - along with a Primary Menu (of categories), which will be used for filtering. These are saved in tutorial.wordpress.xml. Import the tutorial posts and menu (Tools > Import > WordPress in the CMS - you may need to first install the WordPress Importer plug-in). Navigate to the Primary Menu (Appearance > Menus), and enter your homepage URL into the All Categories URL field.

To ensure that we have clean URLs, choose the Post name permalinks option (Settings > Permalinks). Finally, in your file tree, add the tutorial-base-theme folder to /wp-content/themes/ and activate it in the CMS (Appearance > Themes). In this tutorial we will be editing the theme files, which you should access from your favourite text editor.
We are using a very basic theme designed to get the tutorial up and running as easily as possible. The two plug-ins that we are interested in, namely Isotope and Infinite Scroll, are stored in /js/libs.
If you load the homepage you should see a header bar with a home button and category filters and a page container showing the first 10 articles, each floated left. You can change how many articles appear on each page in the CMS (Settings > Reading).
Markup
With set-up complete, let's make some changes to our homepage markup. We'll start with header.php. The navigation bar uses standard boilerplate markup, with the wp_nav_menu function rendering the Primary Menu links. Let's add a class filters to the content div as follows:
<div class="content filters ">
Now edit index.php. We need to add a div to which Masonry will be applied. As Infinite Scroll is triggered, new articles will be appended to this div. We also need to add pagination (which will later be hidden by Infinite Scroll). Alter the start and end of the loop as follows:
<?php if (have_posts()) : ?>
<div class="masonry">
<?php while (have_posts()):the_post(); ?>
…
<?php endwhile; ?>
</div>
<div class="pagination"><?php next_posts_link(); ?></div>
<?php endif; ?>
Masonry
Let's get started on some JavaScript. First we'll add the elements that we've just created as variables in the init function of tutorial.js:
Tutorial.masonry = $('.masonry');
Tutorial.filters = $('.filters');
Tutorial.pagination = $('.pagination');
It's now time to initiate Masonry. We do this by writing an initMasonry function that calls Isotope on Tutorial.masonry, specifying the selector of our articles as .article.
Default layout
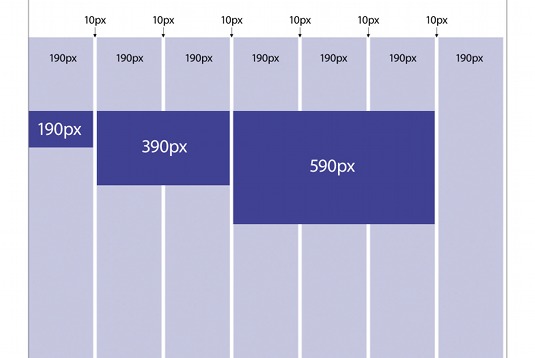
Isotope uses a Masonry layout by default, but we need to specify the columnWidth property. This sets the grid in which articles will be positioned - the left position of each article within the container will always be a multiple of this value.
Our articles are 190px, 390px and 590px wide, and each has a right margin of 10px, so columnWidth is set to 200px. Add initMasonry to your JavaScript file and call it from init.
initMasonry: function() {
Tutorial.masonry.isotope({ itemSelector : '.article', masonry: { columnWidth: 200 } });
}
Reload your homepage, and note how Isotope has filled some of the gaps that were present when floating.
Let's initialise Infinite Scroll with a function initScroll, called after initMasonry in init, so we can view all of the content without reloading the page. We'll call this function on the masonry div, which will expand to contain the extra content.
initScroll:function(){
Tutorial.masonry.infinitescroll({
navSelector : '.pagination', // selector for the pagination container
nextSelector : '.pagination a', // selector for the NEXT link (to page 2)
itemSelector : 'div.article', // selector for all items you'll retrieve
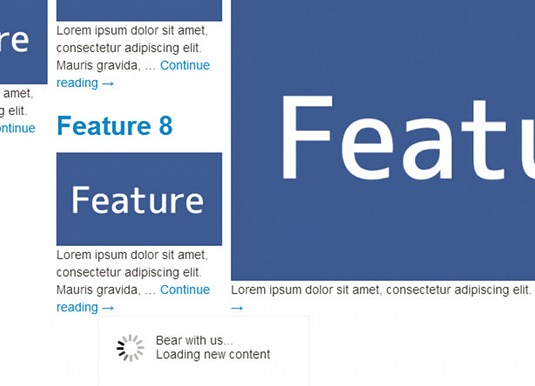
loading: {
speed:'fast',
finishedMsg: '<span class="bearwithus">Sorry...</span><span class="loading">No more articles</span>',
msgText:'<span class="bearwithus">Bear with us...</span><span class="loading">Loading new content</span>',
img: '/wp-content/themes/tutorial-theme/img/ajax-loader.gif'
}
},
// append the new items to isotope on the infinitescroll callback function.
function( newElements ) {
Tutorial.masonry.isotope( 'appended', $( newElements ), Tutorial. finishedAppending);
});
}
The selector properties should be straightforward. We've added a loading message, which displays as new articles are being brought in, as well as a finished message to display once all articles have been loaded.
The callback function uses Isotope's append function to add these new articles to the array of elements in the Masonry layout; this in turn has a callback function that is entered once those articles are appended - we will look at that shortly. Finally we need to ensure that there are enough elements on the page that the user can scroll - in other words, that the height of the masonry div is taller than the height of the window. Add a function:
checkContentFillsPage: function(){
if($('.masonry').height() < $(window).height()){
Tutorial.masonry.infinitescroll('scroll');
}
}
We need to call this function when the page is loaded (in init) and the new items have been appended to the masonry div. This is where we will use our append callback function (Tutorial.finishedAppending):
finishedAppending: function(){
Tutorial.checkContentFillsPage();
}
Load the homepage again and check that new content is being loaded by Infinite Scroll. Try clicking on a header link and notice how the page reloads to show filtered content.
Filtering
Now the challenge is to make our header links behave as in-page filters. First add a line of code to the init function to bind click events on the filters to a filter function:
Tutorial.filters.find('a').bind('click', Tutorial.filter);
When a filter is clicked we need to intercept the default action. We then need to ensure we are not in the process of loading new content (with Infinite Scroll) or appending articles to the masonry div (with Isotope). In order to do this we'll need a Boolean variable Tutorial.isScrolling, defined as false in the init function.
Setting this variable to true on filtering will disable further filtering until the filtered articles have been appended. It should be set to false in the finishedAppending function. We should also add an errorCallback property to our Infinite Scroll options in initScroll, setting isScrolling to false, to enable us to refilter should there be an error in Infinite Scroll.
Now filter
Next, if our filter is not already active, we filter. We need to transfer the active class to the correct filter, and we can update the page URL (without reloading the page) using the history.pushState function. This enables the user to navigate directly to bookmark, filtered content, and allows the website owner to channel people to specific categories should they wish. We should also add a line to init to check whether the user is on a filtered page when they arrive at the site and add the active class accordingly. By making use of WordPress's menu classes, this becomes a simple task:
$('.filters li.current-menu-item').addClass('active');
Filtering is achieved via Ajax using $.get. We remove all articles from the Isotope array, reset Infinite Scroll and then repopulate the Isotope article array with filtered articles.
filter:function(e){
e.preventDefault();
var $this = $(this);
if(Tutorial.isScrolling || $this.hasClass('btn')){
return;
}
else if ( !$this.parent('li').hasClass('active') ) {
Tutorial.filters.find('.active').removeClass('active');
$this.parent('li').addClass('active');
if($this.hasClass('brand')){
$('ul.nav li.all').addClass('active');
}
var $url = $this.attr('href');
if(history.pushState ){
history.pushState('', document.title,$url);
}
$.get($url, function(data){
$data = $("<div>" + data + "</div>");
$data = $data.find(".masonry");
var $new = $data.find('div.article');
Tutorial.masonry.isotope( 'remove', $('.article' ));
Tutorial.resetScroll($url);
Tutorial.masonry.isotope('insert',$new);
window.scrollTo(0,0);
Tutorial.finishedAppending();
});
}
}
Our resetScroll function needs to update the Infinite Scroll page URL to the correct category page and reset Infinite Scroll's internal states. When the user scrolls to the end of any page, the Infinite Scroll plug-in overwrites the loading message with the finished message, so we must also reset the loading message. We then bind the Masonry container to the updated Infinite Scroll.
resetScroll:function(newPath){
Tutorial.masonry.infinitescroll('update', {
path : [(newPath) + 'page/',''], // new path for the paged navigation
state: {
isDuringAjax: false,
isInvalidPage: false,
isDestroyed: false,
isDone: false, // For when it goes all the way through the archive.
isPaused: false,
currPage: 1
},
loading: {
msg: $('<div id="infscr-loading"><img alt="Loading..." src="/ wp-content/themes/*YOUR_THEME_NAME*/img/ajax-loader. gif" /><div><span class="bearwithus">Bear with us...</span><span class="loading">Loading new content</span></div></div>')
}
});
Tutorial.masonry.infinitescroll('bind');
}
That's it! We have access to all of our content on a single page, laid out in a clear interface.
This article first appeared in .net magazine. Thanks to David DeSandro for his peer review of this tutorial.
Words: Emma Lewis
Liked this? Read these!
- Great examples of parallax scrolling websites
- Discover the best jQuery plugins
- How to send large files to clients
Any questions? Ask away in the comments!
Related articles
How To Create Personal Filters In Servicenow
Source: https://www.creativebloq.com/web-design/filter-web-content-infinite-scroll-10134808
Posted by: knighthattlem.blogspot.com
0 Response to "How To Create Personal Filters In Servicenow"
Post a Comment